Matrixを使った座標変換を理解できたので、画像切り抜きを題材にサンプルを作成した。
github.com
経緯
仕事でこんな機能を作る必要があった。
- 画像をロード
- 切り抜き用の矩形を描画
- 矩形は回転可能
- 書き出しを実行
- 画像から矩形範囲を切り抜き
当初Graphics.Clipを利用して切り抜きを行っていた。
- 元画像に対してGraphics.Clipを使い矩形サイズで切り抜き
- 矩形に角度がついていたら切り抜いた画像を回転前に戻す
- 切り抜いた画像のサイズは元画像と同じなので、矩形サイズにもう一度切り抜き
これで問題ないかと思っていたが、いざ検証してみると四辺のどこかに断続的な縁取り線が入っていた。原因は矩形に角度をつけて切り抜きを行った際、四辺が斜めになっていることでジャギってしまい、回転前に戻すとジャギーと背景色が混ざって縁取り線が入ったように見えてしまうことだった。
解決方法は回転前角度に矩形を戻すと同時に、同じ回転量を画像に与えて角度をつけてから切り抜きを行う。こうすることでジャギーが入らずきれいに切り抜くことができる。しかしなかなかこの手法を実現する手段が思いつかなかった。
試行錯誤する中でMatrix.TransformPointsがキモであることはわかったが挙動を理解するまでに時間がかかり、やっと理解できたのでサンプルコードを作って公開した。同じ悩みを抱えている人の参考になればいいかなと思う。
サンプル解説
冒頭に載せたサンプルコードを解説したいと思う。サンプルコードはWinUI3を利用した。本題にWinUI3は関係ないのでWPFアプリでも問題ない。
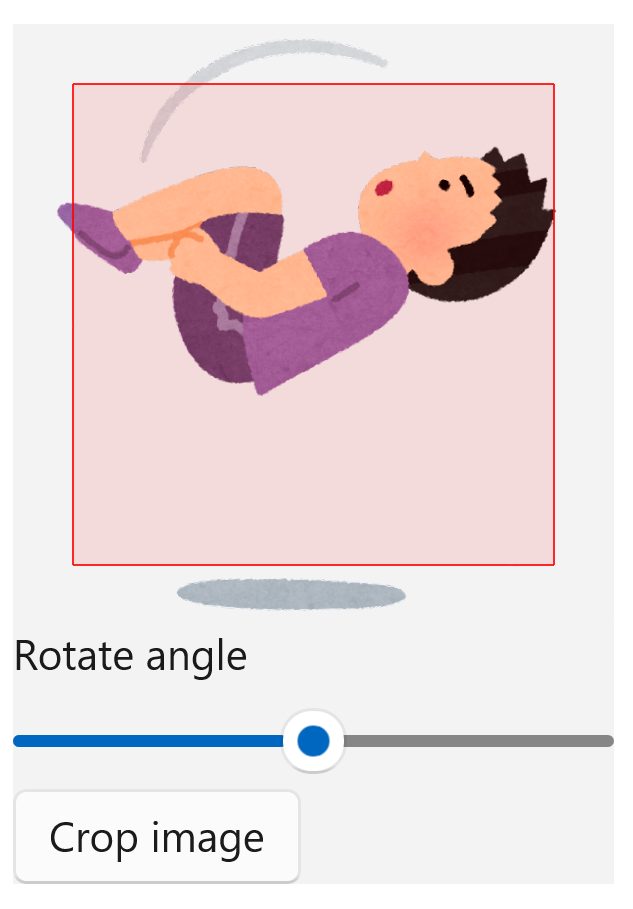
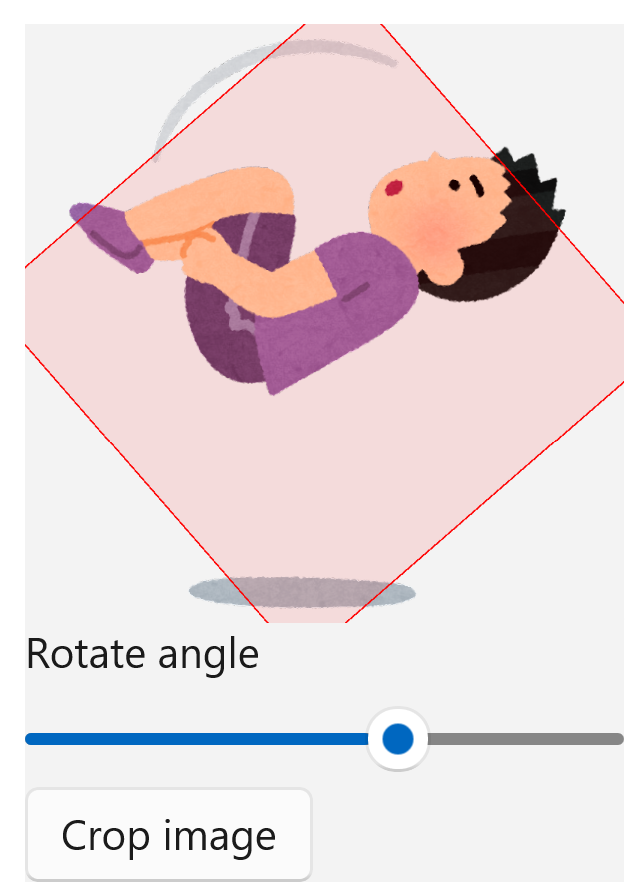
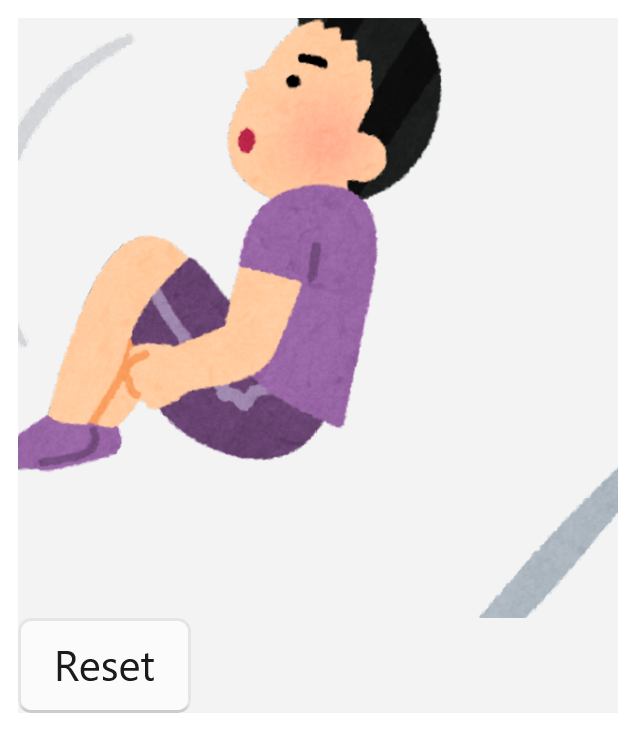
サンプルでは、角度のスライダーを操作して矩形を回転させ、ボタンを押せば矩形に沿った切り抜きを行い、切り抜き後画像を表示する。

起動後の画面

スライダーを使って矩形を回転させたところ

切り抜き実行後
App.xaml.csとMainWindow.xaml.cs
これらは特筆すべき説明箇所はない。起動後、MainWindow.xamlからControlPages\ImageViewPage.xamlを呼び出している。
ControlPages\ImageViewPage.xaml.cs
本題となる切り抜きを行う画面。まずはDrawメソッド。初期表示または後述するAngleSlider_ValueChangedメソッドが受け取った角度を使って画像と矩形を描画する。
- 画像読み込み
- /Assets/Images/undou_zenpou_chugaeri.pngを読み込む
string path = Path.GetDirectoryName(Assembly.GetExecutingAssembly().Location);
System.Drawing.Image source = System.Drawing.Image.FromFile($"{path}/Assets/Images/undou_zenpou_chugaeri.png");
using Bitmap bitmap = new(source);
- 画像中心座標取得
- 矩形座標作成や回転に利用する
float centerX = bitmap.Width / 2;
float centerY = bitmap.Height / 2;
- 矩形座標作成
- 画像に対して80%サイズの矩形を作成する想定
PointF p0 = new(centerX - (centerX * 0.8f), centerY - (centerY * 0.8f));
PointF p1 = new(centerX + (centerX * 0.8f), centerY - (centerY * 0.8f));
PointF p2 = new(centerX + (centerX * 0.8f), centerY + (centerY * 0.8f));
PointF p3 = new(centerX - (centerX * 0.8f), centerY + (centerY * 0.8f));
_points = new[] { p0, p1, p2, p3 };
座標はあとで切り抜きに使うので、プロパティにいれておく
- 矩形座標回転
- Matrix.RotateAtで回転軸を画像の中心に設定して回転する
Matrix matrix = new();
matrix.RotateAt(angle, new PointF(centerX, centerY));   // 回転軸を画像の中心にする
- Matrix.TransformPointsで回転後の矩形座標をプロパティへ適用する
matrix.TransformPoints(_points); // ジオメトリック変換(この例では回転)を矩形座標へ適用する
- 矩形描画
- 変換した矩形座標を使って矩形を描画する
using Graphics graphics = Graphics.FromImage(bitmap);
using Pen pen = new(Color.FromArgb(255, 255, 0, 0), 2);
using SolidBrush brush = new(Color.FromArgb(25, 255, 0, 0));
graphics.Transform = matrix;
graphics.DrawLine(pen, p0, p1);
graphics.DrawLine(pen, p2, p3);
graphics.DrawLine(pen, p0, p3);
graphics.DrawLine(pen, p1, p2);
graphics.FillPolygon(brush, new PointF[] { p0, p1, p2, p3 });
- 表示
- BitmapからBitmapImageに変換して表示する
BitmapImage bitmapImage = new();
using MemoryStream stream = new();
bitmap.Save(stream, ImageFormat.Png);
stream.Position = 0;
bitmapImage.SetSource(stream.AsRandomAccessStream());

Microsoft.UI.Xaml.Controls.Image image = MainImage;
image.Source = bitmapImage;
AngleSlider_ValueChangedメソッドはスライダーを操作したときのイベントハンドラ。ここで得た値をDrawメソッドや後述するCropImage_Clickメソッドで利用する。
最後はCropImage_Clickメソッド。
- 画像読み込みはDrawメソッドと同じ
- 続く処理は実行順序が重要で、変えてしまうと想定した結果にならない
- 矩形座標回転
- 矩形角度を使って画像を逆回転することで、角度のない矩形から画像を切り抜くことができる
using Matrix matrix = new();
matrix.Rotate(_angle * -1);
matrix.TransformPoints(_points);
- 矩形座標取得とサイズ取得
- 回転後の座標を取得する
float xmin = _points.Min(p => p.X);
float xmax = _points.Max(p => p.X);
float ymin = _points.Min(p => p.Y);
float ymax = _points.Max(p => p.Y);
- あわせて矩形サイズを取得して、後続の複写先Bitmapのサイズに使う
int width = (int)Math.Ceiling(xmax - xmin);
int height = (int)Math.Ceiling(ymax - ymin);
- 複写先Bitmap作成
using Bitmap dstBitmap = new(srcBitmap, width, height);
- 画像の切り抜きたい位置が矩形範囲に収まるように矩形座標を移動
- 移動しておかないと、画像の(0, 0)を起点として切り抜きが行われてしまう
matrix.Translate(-xmin, -ymin, MatrixOrder.Append);
- 複写先に描画
- 変換した矩形座標を適用して切り抜き
using Graphics graphics = Graphics.FromImage(dstBitmap);
graphics.Transform = matrix;
graphics.Clear(Color.FromArgb(255, 243, 243, 243)); // 画像の背景色と同じ色で塗りつぶす
graphics.DrawImage(srcBitmap, Point.Empty);
- 画像表示
- Controls\CroppedImagePage.xamlを使って切り抜いた画像を表示する
Frame.Navigate(typeof(CroppedImagePage), (Bitmap)dstBitmap.Clone());
これで画像切り抜きができる。
仕組みがわかってしまえば簡単に実現できることがわかる😭
ControlPages\CroppedImagePage.xaml.cs
パラメーターで受け取ったBitmapを表示する単純な構造なので説明するまでもない。
ソース全文(ControlPages\ImageViewPage.xaml.cs)
using Microsoft.UI.Xaml.Controls;
using Microsoft.UI.Xaml.Media;
using Microsoft.UI.Xaml.Media.Imaging;
using Microsoft.UI.Xaml.Shapes;
using System;
using System.Drawing;
using System.Drawing.Drawing2D;
using System.Drawing.Imaging;
using System.IO;
using System.Linq;
using System.Reflection;
using Windows.Graphics.Imaging;
using Windows.UI;

// To learn more about WinUI, the WinUI project structure,
// and more about our project templates, see: http://aka.ms/winui-project-info.

namespace RotateCropWinUI3App.ControlPages
{
    /// <summary>
    /// An empty page that can be used on its own or navigated to within a Frame.
    /// </summary>
    public sealed partial class ImageViewPage : Page
    {
        private PointF[] _points = Array.Empty();
        private int _angle = 0;

        public ImageViewPage()
        {
            InitializeComponent();
            Draw();
        }

        private void Draw(int angle = 0)
        {
            // 切り抜き対象画像(この段階では表示のみ)を読み込む
            string path = System.IO.Path.GetDirectoryName(Assembly.GetExecutingAssembly().Location);
            System.Drawing.Image source = Bitmap.FromFile($"{path}/Assets/Images/undou_zenpou_chugaeri.png");
            using Bitmap bitmap = new(source);

            // 画像の中心座標を取得する
            float centerX = bitmap.Width / 2;
            float centerY = bitmap.Height / 2;

            // 画像に対して80%の矩形を描画する
            // TODO: 自由に矩形を描画する場合は、マウスポインターから座標を取得するなど動的に座標を決める
            PointF p0 = new(centerX - (centerX * 0.8f), centerY - (centerY * 0.8f));
            PointF p1 = new(centerX + (centerX * 0.8f), centerY - (centerY * 0.8f));
            PointF p2 = new(centerX + (centerX * 0.8f), centerY + (centerY * 0.8f));
            PointF p3 = new(centerX - (centerX * 0.8f), centerY + (centerY * 0.8f));
            _points = new[] { p0, p1, p2, p3 };

            // 矩形座標の回転
            System.Drawing.Drawing2D.Matrix matrix = new();
            matrix.RotateAt(angle, new PointF(centerX, centerY));   // 回転軸を画像の中心にする
            matrix.TransformPoints(_points);                        // ジオメトリック変換(この例では回転)を矩形座標へ適用する

            // 矩形描画
            using Graphics graphics = Graphics.FromImage(bitmap);
            using Pen pen = new(System.Drawing.Color.FromArgb(255, 255, 0, 0), 2);
            using SolidBrush brush = new(System.Drawing.Color.FromArgb(25, 255, 0, 0));
            graphics.Transform = matrix;
            graphics.DrawLine(pen, p0, p1);
            graphics.DrawLine(pen, p2, p3);
            graphics.DrawLine(pen, p0, p3);
            graphics.DrawLine(pen, p1, p2);
            graphics.FillPolygon(brush, new PointF[] { p0, p1, p2, p3 });

            // BitmapImageへ変換
            BitmapImage bitmapImage = new();
            using MemoryStream stream = new();
            bitmap.Save(stream, ImageFormat.Png);
            stream.Position = 0;
            bitmapImage.SetSource(stream.AsRandomAccessStream());

            Microsoft.UI.Xaml.Controls.Image image = MainImage;
            image.Source = bitmapImage;
        }

        private void AngleSlider_ValueChanged(object sender, Microsoft.UI.Xaml.Controls.Primitives.RangeBaseValueChangedEventArgs e)
        {
            _angle = (int)e.NewValue;
            Draw(_angle);
        }

        private void CropImage_Click(object sender, Microsoft.UI.Xaml.RoutedEventArgs e)
        {
            // 切り抜き対象画像(この段階では表示のみ)を読み込む
            string path = System.IO.Path.GetDirectoryName(Assembly.GetExecutingAssembly().Location);
            System.Drawing.Image source = Bitmap.FromFile($"{path}/Assets/Images/undou_zenpou_chugaeri.png");
            using Bitmap srcBitmap = new(source);

            // NOTE: 実行順序が重要。回転 → 移動 → 複写の順に実行する。
            // 矩形座標に回転を適用する
            using System.Drawing.Drawing2D.Matrix matrix = new();
            matrix.Rotate(_angle * -1);
            matrix.TransformPoints(_points);

            // 矩形のサイズを取得する
            float xmin = _points.Min(p => p.X);
            float xmax = _points.Max(p => p.X);
            float ymin = _points.Min(p => p.Y);
            float ymax = _points.Max(p => p.Y);
            int width = (int)Math.Ceiling(xmax - xmin);
            int height = (int)Math.Ceiling(ymax - ymin);

            // 切り抜いた画像の複写先を用意する
            using Bitmap dstBitmap = new(srcBitmap, width, height);

            // 矩形の中心に収まるように移動する
            matrix.Translate(-xmin, -ymin, MatrixOrder.Append);

            // 新しいBitmapに複写する
            using Graphics graphics = Graphics.FromImage(dstBitmap);
            graphics.Transform = matrix;
            graphics.Clear(System.Drawing.Color.FromArgb(255, 243, 243, 243)); // 画像の背景色と同じ色で塗りつぶす
            graphics.DrawImage(srcBitmap, Point.Empty);

            Frame.Navigate(typeof(CroppedImagePage), (Bitmap)dstBitmap.Clone());
        }
    }
}


